Sergii Kryvoblotskyi Head of Technological R&D
Improving macOS Accessibility Features with W1 Chip sensors

- #Accessibility
• 13 min read
Introduction
In today's world, accessibility has become essential in technology design. Apple's macOS devices and software offer a range of features and settings that assist in making devices more accessible for people with disabilities or special needs. In this article, we'll cover some ways to improve accessibility using Apple AirPods or any other device with a W1 chip onboard. We will implement a prototype of controlling macOS by head movements.
macOS accessibility
With more than 1 billion active devices in use worldwide, the impact of Apple and its products on our lives cannot be overstated. Yet for approximately 1.3 billion people, or 16% of the world's population according to the World Health Organization, access to smart technology is a challenge due to various physical or cognitive impairments. To address this issue, Apple has committed to providing innovative accessibility features that enable users with disabilities — both visible and invisible — to take full advantage of their beloved iPhone, iPad, Mac, Apple Watch, and other products. From built-in apps like VoiceOver and Zoom that provide customizable options for vision and hearing impairments to advanced assistive technologies such as Switch Control that allow users with mobility limitations greater freedom of movement than ever before, these features are transforming how we interact with technology daily.
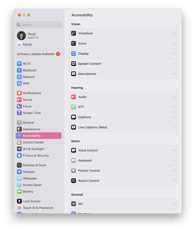
All Apple products come with a built-in suite of accessibility features that people can use to adjust to their vision, hearing, physical motor needs, and more. These features allow users to customize their experience, and many can be turned on or off as needed. On a Mac, many ways exist to access and adjust these settings. For example, users can click on the Apple logo in the top left corner of the screen and select System Preferences from the drop-down menu. From there, they can click Accessibility to view a list of available options. Alternatively, users can also use the Keyboard Viewer to see a list of all available keyboard shortcuts. Each method provides users with a way to tailor their macOS experience to their individual needs.
Apple W1 chip
Apple's introduction of the new W1 chip has been widely heralded as an innovative leap forward for Bluetooth audio products, allowing manufacturers to design headphones and earbuds that offer enhanced convenience and performance. The W1 chip was introduced alongside Apple wireless AirPods and is already being integrated into more and more third-party headsets — giving users even greater choice in sound quality, portability, and battery life from their preferred headphone brand.
Spatial audio
The Apple W1 chip has revolutionized how we experience audio. With its Spatial Audio feature, the sound we hear will feel as if it’s coming from all around in an incredibly immersive listening experience. From wireless earbuds to headphones, this technology is changing what we expect from our music-listening devices and allowing us to indulge in a new world of sound that blurs the boundaries between headphone sensation and surround-sound feelings.
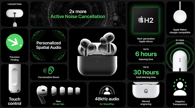
The Spacial Audio feature is powered by an integrated motion sensor which we will use as hardware for the prototype.
Enhancement idea
Our idea is to use W1 Chip Accelerometer to control macOS with head movements. This method is pretty close to Pointer Control that macOS has on board, but it has come key advantages:
- No camera is required. Pointer Control requires good light and high precision, which are not necessarily available all the time.
- "Shortcuts over pointer": we will implement "shortcuts" mapping, so there is no need for precise pointing.
- The user doesn't need to sit exactly in front of the computer.
Recognizing head movements
We will use Apple AirPods Pro for the prototype.
Motion sensors data is available in the SDK in the CoreMotion framework and the CMHeadphoneMotionManager class.
API
However, there is a key problem here: this API, for some unknown reason, is not available on the macOS platform, so we will need to get the data from another device.
COREMOTION_EXPORT API_AVAILABLE(ios(14.0)) API_UNAVAILABLE(macos)
@interface CMHeadphoneMotionManager : NSObject
Fortunately, this API works well on iOS, so we can use mobile devices as a proxy to get sensor data and transfer it to the computer.
So the high-level architecture will look like this:
sequenceDiagram
	W1 Chip Sensor->>Proxy: Raw Sensor Data
  Proxy->>Client: Mapped Head Movements
Proxy
As a proxy, we will use an iOS mobile device. The implementation on mobile devices consists of 3 key steps:
- Handle the headphones connection.
- Read the sensor data.
- Transfer the data to the computer.
Handle headphones connection
Headphones connection state is available via the CoreMotion framework and the CMHeadphoneMotionManagerDelegate class:
@available(iOS 14.0, *)
public protocol CMHeadphoneMotionManagerDelegate : NSObjectProtocol {


    /*
     *  headphoneMotionManagerDidConnect:
     *
     *  Discussion:
     *    Invoked when a headphone is connected.
     *    Execution of the delegate callback occurs on the operation queue used to deliver the device motion updates.
     *    The main thread is used if the queue was not specified.
     */
    optional func headphoneMotionManagerDidConnect(_ manager: CMHeadphoneMotionManager)


    /*
     *  headphoneMotionManagerDidDisconnect:
     *
     *  Discussion:
     *    Invoked when a headphone is disconnected.
     *    Execution of the delegate callback occurs on the operation queue used to deliver the device motion updates.
     *    The main thread is used if the queue was not specified.
     */
    optional func headphoneMotionManagerDidDisconnect(_ manager: CMHeadphoneMotionManager)
}
Read sensors data
Reading the sensor data is also available via the CoreMotion framework and the CMHeadphoneMotionManager class:
    /*
     *  startDeviceMotionUpdatesToQueue:withHandler:
     *
     *  Discussion:
     *    Starts device motion updates, providing data to the given handler through the given queue.
     *
     */
    open func startDeviceMotionUpdates(to queue: OperationQueue, withHandler handler: @escaping CMHeadphoneMotionManager.DeviceMotionHandler)
Once the headphones are connected and motion updates are started, the CMDeviceMotion class is being delivered to the callback with every head motion update.
Head's attitude is available via the CMAttitude class as its pitch, yaw, and roll:
/*
 *  roll
 *
 *  Discussion:
 *    Returns the roll of the device in radians.
 *
 */
@property(readonly, nonatomic) double roll;

/*
 *  pitch
 *
 *  Discussion:
 *    Returns the pitch of the device in radians.
 *
 */
@property(readonly, nonatomic) double pitch;

/*
 *  yaw
 *
 *  Discussion:
 *    Returns the yaw of the device in radians.
 *
 */
@property(readonly, nonatomic) double yaw;
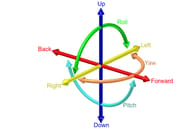
CoreMotion outputs a direction cosine matrix — a rotation from the last "old" orientation to the new orientation of the device.
For this prototype we will use 6 types of movements:
enum HeadGesture: String, Codable {

    case up, down, right, left, forward, back
}
| Gesture Visualization | Gesture Direction | Gesture Visualization | Gesture Direction |
|---|---|---|---|

| Up | 
| Left |

| Down | 
| Forward |

| Right | 
| Back |
So once roll, pitch and yaw are delivered, a simple mapping can be used:
private var headThreshold: Double = 0.4
private var headThresholdCorrection: Double = 0.5

extension ViewController {

    func handleMotion(with motion: CMDeviceMotion) {
        let pitch = motion.attitude.pitch
        let yaw = motion.attitude.yaw
        let roll = motion.attitude.roll

        let pitchHandled = pitch > (headThreshold * headThresholdCorrection) || pitch < -headThreshold
        let yawHandled = yaw > headThreshold || yaw < -headThreshold
        let rollHandled = roll > headThreshold || roll < -headThreshold

        if pitchHandled {
            if pitch > (headThreshold * headThresholdCorrection) {
                handleGesture(gesture: .up)
            } else if pitch < -headThreshold {
                handleGesture(gesture: .down)
            }
        } else if yawHandled {
            if yaw > headThreshold {
                handleGesture(gesture: .left)
            } else if yaw < -headThreshold {
                handleGesture(gesture: .right)
            }
        } else if rollHandled {
            if roll > headThreshold {
                handleGesture(gesture: .forward)
            } else if roll < -headThreshold {
                handleGesture(gesture: .back)
            }
        }
    }
}
Transfer movements to the computer
Once movements are handled and mapped, they have to be delivered to the computer within a local network environment. We used Bonjour broadcasting to get this done.
import DTBonjour

final class Broadcaster: NSObject {

    private let server: DTBonjourServer

    override init() {
        self.server = DTBonjourServer(bonjourType:  "_mt_broadcasting_protocol._tcp.")
        super.init()
        self.server.delegate = self
    }

    func start() {
        self.server.start()
    }

    func broadcast(gesture: HeadGesture) {
        let encoder = JSONEncoder()
        do {
            let data = try encoder.encode(gesture)
            self.server.broadcast(data)
        } catch {
            print(error)
        }
    }
}
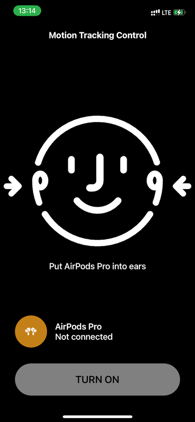
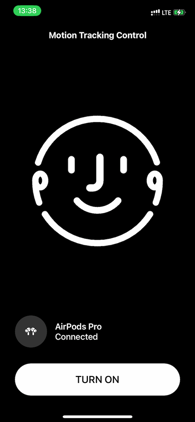
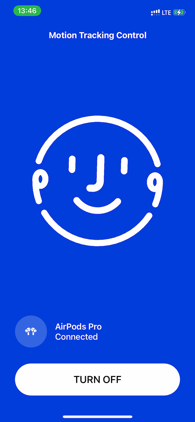
The video demonstrates how an iOS application connects to the headphones, gets the motion data, and handles the head movements:
Client
Once the Proxy side is ready, we can switch to the client side.
The main tasks here are:
- Observe head movements from the proxy.
- Send corresponding events to the system events chain to control the computer.
- Provide a user interface to get the user acquainted with available movements.
Observe head movements
Since we have used Bonjour service to broadcast mapped movements to the local network, the same technology should be used to handle them.
Browse available services:
import Foundation

final class ServersBrowser: NSObject, ObservableObject {

    var onServersChanged: (([Server]) -> Void)?

    @Published private(set) var servers: [Server]

    private let mockupServiceType = "_mt_broadcasting_protocol._tcp.";
    private let workingQueue = DispatchQueue(label: "ServersBrowser.workingQueue")
    private let receiverQueue = DispatchQueue.main
    private let bonjourBrowser: NetServiceBrowser

    init(bonjourBrowser: NetServiceBrowser = .init(), servers: [Server] = []) {
        self.bonjourBrowser = bonjourBrowser
        self.servers = servers
        super.init()
        self.bonjourBrowser.delegate = self
    }

    func start() {
        bonjourBrowser.searchForServices(ofType: mockupServiceType, inDomain: "")
    }

    func stop() {
        bonjourBrowser.stop()
    }
}
Connect to the service:
import AppKit

class BonjourConnection: NSObject {

    var onGestureReceived: ((HeadGesture) -> Void)?

    let internalQueue = DispatchQueue(label: "BonjourConnection.internal")
    let connection: DTBonjourDataConnection

    init(service: NetService) {
        self.connection = DTBonjourDataConnection(service: service)
        super.init()
        self.connection.delegate = self
    }

    func open() {
        connection.open()
    }

    func close() {
        connection.close()
    }
}

extension BonjourConnection: DTBonjourDataConnectionDelegate {

    func connection(_ connection: DTBonjourDataConnection!, didReceive object: Any!) {
        self.internalQueue.async {
            guard let data = object as? Data else { return }
            let decoder = JSONDecoder()
            do {
                let gesture = try decoder.decode(HeadGesture.self, from: data)
                DispatchQueue.main.async {
                    self.onGestureReceived?(gesture)
                }
            } catch {
                print(error)
            }
        }
    }
}
Update system events stream
Once head movements are handled, the system events stream should be updated to control the system. We will simplify this task by simulating keyboard events, so the system will handle them accordingly.
private extension Keyboard {

    func simulateKeyboardKey(_ key: UInt16) {
        let rightArrowKeyCode: UInt16 = key
        let keyDownEvent = CGEvent(keyboardEventSource: nil, virtualKey: rightArrowKeyCode, keyDown: true)
        keyDownEvent?.post(tap: CGEventTapLocation.cghidEventTap)

        let keyUpEvent = CGEvent(keyboardEventSource: nil, virtualKey: rightArrowKeyCode, keyDown: false)
        keyUpEvent?.post(tap: CGEventTapLocation.cghidEventTap)
    }
}
This code uses system Accessibility features to simulate keyboard events. The system will prompt the user with consent to accept those events.
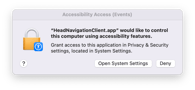
The client application will be added to the Privacy->Accessibility section of the System Preferences:
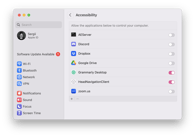
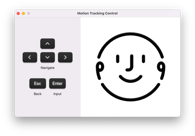
Preferences Window
To get the users acquainted with the movements available, we have implemented a preferences window. It demonstrates supported head movements and the keystrokes that bind to them.
Now a macOS system can be controlled by head movements using Apple AirPods.
Live Demo
Conclusion
Regardless of the system limitations and unavailability of some CoreMotion features on macOS, W1-chip-powered headphones could be a great addition to the built-in provided accessibility features. We can use various head movements to map system events and simplify navigation by implementing key binding or other types of events.
Source Code
Links
This is an independent publication and it has not been authorized, sponsored, or otherwise approved by Apple Inc.