Oleksandr Voloshchenko Senior Software Engineer (Front-End)
Migration to Next.js from Laravel

- #NextJS
- #Web
• 9 min read
At the CleanMyMac web team, we have decided to migrate from Laravel to Next.js as our framework of choice. In this article, I explain our rationale and share details of the process.
Why did we decide to go to Next.js?
1️⃣ Standardize the tech stack
Say hello to the Japanese version of CleanMyMac 👋

CleanMyMac is a global product, but has several distinct websites to better appeal to the local markets, namely Japan and China. As a result, the web team is responsible for several similar projects:
- cleanmymac.jp
- cleanmymac.com
- cleanmymac.cn
- New websites for new markets, i.e. cleanmymac.*
Aside from the visual similarities, these websites share common features, such as a blog, support page, FAQ, announcements. However, all the projects have different tech stacks:
| cmm.jp | cmm.com | cmm.cn |
|---|---|---|
| Tailwind CSS | Sass | Tailwind CSS |
| Stimulus JS | Vanilla JS | MacPaw custom framework |
| TypeScript | JavaScript | JavaScript |
| Laravel | Laravel | Laravel |
Therefore, the idea behind going to Next.js was to standardize tech across all the current and future websites.
2️⃣ Change the approach to launching content websites
With the pace of CleanMyMac expansion, it’s highly likely we’ll launch new websites. Previously, we simply copied a repository and started rewriting and fine tuning.
This approach was convenient, allowing us to transfer lots of functionality – admin board, announcement handling, localization, etc. However, it also transferred legacy code and created duplicates across projects.
3️⃣ Improve web vitals
Web vitals are becoming increasingly important as they influence page ranking. It is crucial for our websites to be as fast as possible.
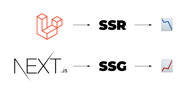
The default Laravel server-side rendering has some limitations. For instance, each page request triggers a rerender. After evaluating our needs, we found that static site generation (SSG) was the best solution for us.
4️⃣ Better developer experience

Our goal was also to improve the developer experience. We wanted to create the frontend using something better than blade templates. And as far as the backend goes, the frontend is not too concerned with the implementation – we work with everything they provide.
Migration Process
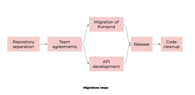
Step 1: Separating repositories
We started the migration process by creating a new repository, where we set up the static site generator and the front-end project. At this stage, we agreed that there would be two repositories responsible for the Japanese site:
- The public API site needed for static generation and the admin panel
- The project's front-end
Step 2: Agreeing with the backend. We negotiated with backend developers on how we would interact with the API. We decided on using OpenAPI. OpenAPI is a specification for how an HTTP API should operate. The beauty of this is that it does not dictate how the API should be implemented but describes the data it should return.
See OpenAPI Specification v3.1.0
For example, if a frontend developer needs an API, they describe it in the documentation, and the backend developer implements it. The greatest benefit – we agree on the data interface before starting to write the code.
Step 3: Transferring the frontend web development to the new repository
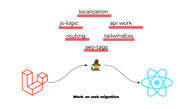
At this stage, we had to rewrite blade templates in React and migrate the JS logic under the new stack. In our case, it was convenient that the site's styles were written in TailwindCSS, which made the style transfer relatively straightforward.
Since the API was agreed upon, we could mock the data on the frontend side and calmly rewrite the site.
Pro Tip: It's also essential to maintain the URL structure of the original site. If you need to change addresses, it's recommended to discuss it in advance with the SEO department.
Step 4: Creating a public API
To generate static content, it's necessary to configure endpoints that will deliver data for generation. In our case, these were blog articles.
Step 5: Setting up domains. Before the release, we needed to replace the old site at cleanmymac.jp with the new one. The change took place in several steps:
- Deploying the API on the domain api.cleanmymac.jp
- Deploying the new site on the domain next.cleanmymac.jp
- Pre-release testing of the new site
- Switching the domain next.cleanmymac.jp to cleanmymac.jp

Step 6: Removing legacy code
Removing legacy code, or code clean-up, is a crucial process for enhancing the readability of the new codebase. It also streamlines the maintenance processes making it easier for developers to test and improve.
Migration Pitfalls
Before starting the whole migration process, it's crucial to consider what could go wrong, including the framework's limitations and our planned response.
Unsupported features. From the very start, we were aware of the unsupported features that require a Node.js server, or dynamic logic that cannot be computed during the build process.

In the aftermath, most of the problems that arose were related to the limited functionality of SSG in Next.js. There was also an issue with the localization of routes.
Nevertheless, I would also like to share an extensive account of our experience with other pitfalls we came across to help developers who may feel unfamiliar when switching from Laravel to SSG.
1️⃣ Redirects
Our site includes some links that direct to external sites. For instance, the policy pages. In the old site, we put 301 redirects on the backend. However, we found that there are some limitations to 301 redirects for SSG because they are processed on the server.
For now, we've implemented them using 200 js redirects. In the future, we plan to rewrite this functionality as we may receive requests from the SEO department to add redirects for blog articles.
2️⃣ Robots.txt
Since we don't have a running node.js server, we can't render dynamic robots.txt on request. Moreover, robots.txt varies between production and staging. We didn't want to manually change sitemaps, so disallowed links for indexing each time.
3️⃣ Sitemaps.xml
Sitemaps are crucial for SEO. As it turns out, there are some difficulties with them too because they have to be generated outside the Next.js stack.
To speed up implementation, we decided to move sitemap generation to the backend. The flow looks like this:
- We run a job once a day
- The job looks for new articles that have been published via the admin panel
- If new articles are found, we add them to the sitemap
- We upload the sitemap to the CDN
- The frontend connects to the generated sitemap on the CDN
4️⃣ reCAPTCHA

We need to make some modifications to the working Captcha v3. For SPA apps, it doesn't disappear after appearing. We can choose not to display the captcha, but to do that, we need to make a change in the support form.
See Hiding reCAPTCHA
5️⃣ Canonical Url
To generate canonical and other meta tags, you need to know the domain of the site. Accordingly, it needs to be passed into the project. Interestingly, now for some changes on the frontend, it's necessary to make changes in the code that relates to the DevOps team.
6️⃣ Announcements
Announcements are the banners that we hang on the site when we launch a promotional campaign where we offer a discount on CMM. This is how announcements look.

We had an expectation that an announcement will be generated only when the date is right for each page load. Yet, in reality, the announcement is generated at the build stage of the project. Here you can see that the announcement code gets into a static build.

We're still thinking about a solution:
- Quick solution — decide whether to generate it in useEffect, but it affects CLS.
- Better solution — regenerate the static when the offer expires.
7️⃣ Localization / react-intl + crowdin
First, I should explain how localization works.
- The primary source of texts is the code
- Based on the code, we generate a json file with texts we use in the code
- Then we give this to translators
- And then we download and use another locale
But there's a problem in this flow. If two developers are simultaneously working on a feature that requires translation, there's a chance that the locales being sent to crowdin will be overwritten. Good news: we already found a solution. For that we use Versions Management from crowdin.
8️⃣ Pagination
What could possibly go wrong with pagination?
If you look at how it works for Laravel projects, you'll notice that it uses the page parameter.
- Example of a page: https://cleanmymac.com/blog?page=2
- Now pay attention to the blog article: https://cleanmymac.com/blog/mac-slow-after-update
What's the problem? Pagination on Next.js with SSG does not support queryParams, so you have to change the URL structure. After long discussions with the SEO department, they asked us to make links like blog/page-2, i.e. cleanmymac.com/blog/page-2.
So my question to you: “Is there any problem with such a link structure?”
- Link to pagination: https://cleanmymac.com/blog/page-2
- Link to the article: https://cleanmymac.com/blog/mac-slow-after-update
The answer is simple: we have a common [slug]. Due to this URL structure, the code responsible for building routes and fetching parameters becomes difficult to perceive.
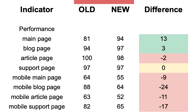
Analytics
Let's analyze the benefits of transitioning to Next.js, particularly by comparing page speed metrics. This will allow us to better understand the impact of this change on the user experience and website performance.
We can examine these details using Google PageSpeed.
Conclusions
See what we’ve generally accomplished with Next.js:
- align tech stack – ✅
- change our approach to website development – ✅
- web vitals – need more research
- better development experience – need more research
Overall, the migration towards Next.js has been an insightful journey, and I believe it was a move in the right direction.