Yaroslav Romanenko Senior Software Engineer (Front-End)
Comfortable Speed: Analysis of Modern Build Tools

- #Vite
- #webpack
- #NextJS
• 15 min read
Unveiling Comfortable Speed: A Comparative Analysis of Modern Build Tools
In this exploration of the tech landscape, we delve into the realm of build tools – the unsung heroes powering our development workflows. Our focus spans from the veteran giants to the rising stars – Webpack, Next.js, Parcel, and the dynamic contender, Vite. Join us as we unravel the evolution of these tools, contextualize their roles, and understand how they shape our coding journeys.
In this article we will cover the following topics:
- Webpack - a few words about the old guard.
- Next.js - discussing why Next.js isn't always the best fit.
- Parcel - touching on the drawbacks of relying too much on magic.
- Vite - introducing our favorite and exploring configuration for various use cases.
Setting the Stage
Before we dive into the technical intricacies, let's take a moment to address the purpose and motivation behind this journey.
Imagine a world where developers choreograph their code to the rhythm of bundlers.
Today, we embark on an expedition through this very world, with a spotlight on one tool that's stealing the show.
Catalyst for change. The driving force behind our quest? The persistence of those pesky 3-5 security tickets, haunting us due to our dependence on react-scripts.
A journey rooted in research. This article is the culmination of rigorous R&D. We embarked on a quest for alternatives to Webpack, particularly aiming to replace the often constrictive react-scripts and its deep ties to Webpack. Our exploration spanned multiple contenders – custom Webpack configurations, Parcel, Next.js, and the captivating Vite. Each approach was meticulously integrated into our platform to uncover their unique merits.
The emergence of Vite. Vite, the swift and innovative game-changer, is the main focus of this article. We'll share our experience of transitioning our entire platform to Vite's paradigm.
Turbocharge, anyone? While Turbopack showed much potential, we opted to steer clear due to the inherent risks of implementing super raw beta, although very advanced technology into a large project. After all, we don’t want to deal with vulnerabilities that
Let’s get started. As we proceed, get ready for a journey through the tools that orchestrate the tech symphony. From the steadfast giants to the bold disruptors, we'll dissect their DNA, decode their design philosophies, and equip you to make informed choices for your coding escapades.
Build Tools Summary
| Aspect | CRA ejected (Webpack) | Vite | Next.js | Parcel |
|---|---|---|---|---|
| Speed | ⭐️⭐️ | ⭐️⭐️⭐️⭐️⭐️ | ⭐️⭐️⭐️⭐️ | ⭐️⭐️⭐️ |
| Dev run | 7s | 400ms | -1s | 4.29s |
| Prod build | 15.47s | 7s | ⛔️not stable | ⛔️not stable |
| Risks | ⭐️ | ⭐️⭐️ | ⭐️⭐️⭐️⭐️ | ⭐️⭐️⭐️⭐️ |
| Ease of migration | ⭐️⭐️ | ⭐️⭐️⭐️⭐️⭐️ | ⭐️ | ⭐️ |
| Bundle size | gzip: 315.23 kB | 1.1MB (gzip: 354.77kB) | ~7MB (total chunks main+app) | ~6MB |
| Radar | ADOPT | TRIAL | TRIAL | ASSESS |
First Contender – Webpack: The Battle-Hardened Veteran
Webpack, the seasoned architect of project bundling, stands as a towering giant in the world of bundlers. Yet, the mighty titan struggles to breathe as of lately.
The temptation of stripping down: ejecting. The allure of a fresh start beckons. Many, like us, have been enticed to eject from the confines of abstractions like 'create-react-app' and brave the raw wilderness of plain Webpack.
The reality check. Eject, however, doesn't come without its challenges. We found ourselves knee-deep in a torrent of dependencies.
The node modules quagmire. The running joke about the bewildering nature of node_modules holds true. Attempting a complete revamp without destabilizing everything proved to be an uphill task.
Diving into the react-scripts abyss. The configuration intricacies of react-scripts, interwoven with its offspring packages, posed an intimidating challenge to disentangle.
Weighing the pros and cons of Webpack
Upsides:
- Seamless transition: The eject process is relatively painless.
- Stability: Maintains the status quo, requiring little adaptation.
- Low risk: No disruptions to your stability.
- Tailored configuration: The freedom to tailor the configuration to individual needs.
Downsides:
- Core issues: It doesn’t solve dependency and security concerns.
- The customization conundrum: Tweaking configurations becomes a growing burden.
- Bearing the support yoke: Shouldering the responsibility of maintaining updates and fixes.
Choosing the path forward. Considering the plethora of drawbacks and with sanity prevailing, we opted not to sponsor pharmaceutical companies or psychotherapists. Instead, we chose to continue our research journey.
Next Contender: Next.js
Introducing our next contender: Next.js, the tech sensation known for its beauty and finesse. However, the versatile Swiss army knife of build tools may be too complex.
The marvel of Next.js and Vercel. We can safely agree that the technology and prowess of Vercel is cool. Their presentations, solutions, and the entire Next.js ecosystem leave us awe-inspired.
The arsenal of capabilities. From Server-Side Rendering (SSR) to Single Page Applications (SPA), Static Site Generation (SSG) to Progressive Web Apps (PWA), Next.js boasts a spectrum of functionalities to suit every taste and need.
Seeking the right fit: our SPA pursuit. Our quest, however, was to find an optimal solution for Single Page Applications (SPAs). We needed a seamless build process that didn't burden us with additional tasks and offered potential benefits.
Opportunities with Next.js. Adopting Next.js opens a world of possibilities. While we could eventually delve into SSR for enhanced speed and performance, our business isn't confined to SSR or SPA. With a closed platform, SPA aligns better with our needs. Plus, envisioning it solely as a solution for SPAs felt like using a massive tractor to dig a small garden bed for mom's tomato plants (an analogy to real-life situations).
Summing up Next.js advantages and downsides
Advantages:
- Flexibility: Out-of-the-box support for SSR, SSG, SPA, and PWA with adaptable configurations.
- Webpack + TurboPack: Support for both Webpack and TurboPack, with configuration managed by Vercel, while allowing customization as needed.
- Future-proofing: Offers an avenue for future technical enhancements.
Downsides:
- Transition effort: Migrating requires extensive work on routing, image handling, isServer checks, and more.
- SPA implementation challenges: Implementing SPAs on Next.js might feel more like a workaround than a seamless solution. We're wielding a massive combine harvester for tasks it wasn't specifically designed for, with uncertainty about global changes.
A complex choice. Hence, Next.js presents a blend of advantages and caveats. For our specific requirements, it might be a bit too heavy and suboptimal, especially if considered solely for SPA implementation.
Introducing the Magician: Parcel
Ladies and gentlemen, please welcome our new contender to the ring: Parcel - the zero-configuration wizard.
The zero-configuration enigma. Parcel, often touted as the "zero-configuration" bundler, lives up to its magical reputation. With nearly no setup needed, it boasts a lightning-fast cache mechanism, expediting the project build process. While this all sounds promising, a closer look revealed that Parcel’s magic doesn’t scale.
A caveat for complex projects. For extensive projects or those utilizing workspaces, Parcel's wand loses its enchantment. Suddenly, you're faced with the mundane task of specifying every step for your project's build. In my opinion, Parcel finds its sweet spot when building packages or small monolithic projects.
A miss for us too. As you may have guessed, it didn't quite align with our needs either.
Upsides and downsides of Parcel
Advantages:
- Zero configuration needed: No need to tweak configurations.
- Speedy build with cache: Thanks to caching, it offers relatively swift performance.
Limitations:
- Limited customization: Struggles with fine-tuning build configurations.
- Style import woes: Struggles with importing styles from node_modules.
- Transition effort: Requires significant effort for stabilization.
- The mystifying magic: Understanding the mechanics often involves diving into source files of every package.
- Complex configuration overload: When configured for a large project, Parcel's configuration can surpass Webpack's.
Parcel's verdict. In conclusion, Parcel, like any tool, presents both pros and cons. For our project, it didn't fit due to its limitations and flexibility issues in customizing builds. This underscores the importance of selecting the right tool based on specific project needs and nuances.
Gearing Up for Speed: Embrace Vite's Lightning Swiftness
Hold tight for velocity! Put on your windproof goggles, fasten your seatbelts (they should have been fastened long ago), as we surge into hyperspeed. And here, we welcome Vite.
Vite - the lightning ninja. Allow me to introduce you to the epitome of speed and simplicity: Vite. A blazingly fast demon that's convenient and user-friendly. This bundler has won both our trust and our hearts. Let me walk you through why it's so amazing.
Simplicity takes center stage. First and foremost, simplicity. Vite was like a gulp of fresh air or a sip of unfiltered beer on a Friday evening after a successful sprint. Those are the emotions it evokes. Vite offers an amazingly intuitive configuration that's not much larger than Parcel's, but this time it's all in your hands.
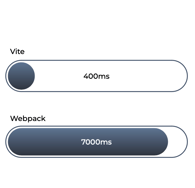
Next: speed. For context, Webpack with react-scripts took 7 seconds to build in development mode (using a reseller dashboard), while Vite launches in a whopping 400 ms! What's the secret behind this 17.5x speed boost?
Hot reload is also several times faster. React-scripts' production build averaged at 15 seconds, while Vite's took nearly half of that - 7 seconds. Operations on even our largest dashboard, the customer account, are so swift that I no longer have a need for coffee breaks.
Stability that speaks volumes. Initially, I couldn't believe that transitioning from CRA to Vite could be this seamless. I wrote my first config, and both development and production builds worked stably.
Noteworthy tidbits on Vite
- EsBuild + Rollup: Vite utilizes different bundlers under the hood for dev and production builds - ESBuild and Rollup, respectively. This can lead to unforeseen bugs stemming from the build process. But Vite has a solution - a preview mode that locally mimics production builds with Rollup.
- Youthful project: It's relatively young, so minor issues might arise, but the community is actively addressing them.
- Tests: While Vite lacks out-of-the-box Jest support, the Vite community has come up with its test runner - Vitest.
In summary, our champion - Vite. So, our champion is the Vite build tool, the nimble samurai with a sharp sword, providing us not only speed and flexibility, but most importantly, a sense of joy.
Enough chitchat, let's get hands-on with Vite and witness its magic in action.
Unleashing the Power of Vite in Practice
Creating a Vite project from scratch. Let's dive into the most common scenario: building a frontend Single Page Application (SPA) with Vite. To create a Vite project, execute the command:
yarn / npm / pnpm create vite
Stack. Vite boasts a powerful CLI that lets you effortlessly choose your preferred stack. It provides a variety of presets for different frameworks: Vanilla, Vue, React, Preact, Lit, Svelte. I'll choose React.
Language. In addition, you can choose the language, for example, if for some strange reason you want to write your project in JS - you can do it. You also have the option to use the SWC compiler:
- TypeScript
- TypeScript + SWC
- JavaScript
- JavaScript + SWC
Structure. Now, let's take a look at the project structure. In the src directory lies our application. There's a basic ESLint configuration, and pay attention to the index.html file in the project root – it's the entry point for our SPA. This file serves as a configuration file in a sense.
It's important to note that placing this file in public or elsewhere won't work due to Vite's design, which relies on the index.html in the project root as the entry point. The index.html itself is part of the module graph. This is a concept you should adhere to when working with Vite projects.
Vite configuration
Now, let's delve into Vite's configuration. It’s remarkably concise – only 7 lines! This is incredibly efficient. The impressive speed and the minimal configuration differentiate Vite from its competitors.
import { defineConfig } from 'vite';
import react from '@vitejs/plugin-react-swc';

// https://vitejs.dev/config/
export default defineConfig({
  plugins: [react()],
});
However, this is the basic configuration and might not work well with older browsers. So, let's explore a slightly more intricate configuration that we use in our platform.
See full code:
import path from 'path';
import legacy from '@vitejs/plugin-legacy';
import react from '@vitejs/plugin-react-swc';
import { defineConfig, loadEnv, UserConfig, UserConfigExport, Alias } from 'vite';
import svgrPlugin from 'vite-plugin-svgr';
import viteTsconfigPaths from 'vite-tsconfig-paths';

export interface GetViteConfigOptions extends UserConfig {
  mode: string;
  disableLegacyPlugin?: boolean;
}

const getViteConfig = (options: GetViteConfigOptions): UserConfigExport => {
  const {
    mode,
    define,
    plugins = [],
    build,
    server,
    preview,
    resolve,
    disableLegacyPlugin = false,
    ...restOptions
  } = options;
  const currentEnvs = loadEnv(mode, process.cwd());

  const { alias = [], ...restResolve } = resolve || {};

  // expose .env as process.env instead of import.meta since jest does not import meta yet
  const envWithProcessPrefix = Object.entries(currentEnvs).reduce((prev, [key, val]) => {
    return {
      ...prev,
      [`process.env.${key}`]: `"${val}"`,
    };
  }, {});

  const getServerHMROptions = () => {
    const defaultHMR = {
      protocol: 'ws',
      port: parseInt(currentEnvs.VITE_SOCKET_PORT ?? '', 10),
      host: currentEnvs.VITE_SOCKET_HOST,
    };

    if (typeof server?.hmr === 'boolean') {
      return server.hmr;
    }

    if (typeof server?.hmr === 'object') {
      return {
        ...defaultHMR,
        ...server.hmr,
      };
    }

    return defaultHMR;
  };

  return defineConfig({
    define: {
      ...envWithProcessPrefix,
      ...define,
    },
    plugins: [
      react(),
      viteTsconfigPaths(),
      svgrPlugin(),
      disableLegacyPlugin
        ? null
        : legacy({
            targets: ['Chrome > 48', 'safari >= 9', 'Firefox > 48', 'Opera > 57', 'edge >= 16'],
          }),
      ...plugins,
    ],
    build: {
      outDir: 'build',
      minify: 'terser',
      sourcemap: false,
      terserOptions: {
        compress: true,
        format: {
          comments: false,
        },
      },
      ...build,
    },
    server: {
      origin: currentEnvs.VITE_APP_PUBLIC_URL,
      port: parseInt(currentEnvs.VITE_PORT ?? '', 10),
      ...server,
      hmr: getServerHMROptions(),
    },
    preview: {
      port: parseInt(currentEnvs.VITE_PORT ?? '', 10),
      ...preview,
    },
    resolve: {
      alias: [
        {
          find: '~@packages/helpers/src',
          replacement: path.join(__dirname, '../../helpers/src'),
        },
        {
          find: /^~?!(react-toastify).+/,
          replacement: (val: string) => val.replace(/^~/, ''),
        },
        {
          find: '~react-toastify/dist/ReactToastify.min.css',
          replacement: path.join(__dirname, '../../components/node_modules/react-toastify/dist/ReactToastify.min.css'),
        },
        ...(alias as readonly Alias[]),
      ] as readonly Alias[],
      ...restResolve,
    },
    ...restOptions,
  });
};

export default getViteConfig;
Environment Variables (ENVS). Let’s first talk about "loadEnv". Why do we use this utility? By default, Vite doesn't provide access to environment variables in the usual format via "process.env.[env name]". Instead, for safer access, Vite uses "import.meta.env.[ENV_NAME]".
Hence, to maintain backward compatibility with previous env variables, and because JEST doesn't support "import.meta", we enable access via "process.env". We iterate through our env variables, placing them in the global "process.env" variable, ensuring they are enclosed in quotes. Alternatively, you could use "JSON.stringify".
Remember: when using Vite, prepend "VITE_" to your variable.
Define. Next, we pass this object to "define" to replace global constants with our own values.
Hot Module Replacement (HMR). After that, we have the "getServerHMROptions" function, defining HMR parameters for our Vite server.
DefineConfig. Then, we reach the heart of our configuration – the "defineConfig" function. It's a helper that allows us to configure our Vite. Within it, we use its two properties: "build" and "serve".
Plugins. Next crucial step – plugins. We use only these plugins (the essential minimum):
- viteTsconfigPaths: A standard plugin for React responsible for the correct resolution of aliases from the TS configuration, so that all paths are collected correctly.
- svgrPlugin: A plugin for generating type declarations responsible for converting SVG into React components.
There is also a legacy plugin that we don't really like - it helps to compile a separate bundle for outdated browsers without es-modules support. Of course, this plugin slows down the build several times, but it is still faster than Webpack.
Build Configuration. Following is the build configuration, which is so intuitive that it hardly requires explanation.
- Specify build parameters – where everything will be built, whether to use an ESBuild or Terser code minifier.
- Generate source maps and minifier configuration.
Server Configuration. The "server" configuration comes next. Here, we specify the settings for our local dev server: port, URL, and HMR settings.
Preview Configuration. "Preview" is what we mentioned earlier – a property responsible for locally running in production mode.
Resolve Configuration. We then set up aliases to properly resolve certain imports with ambiguities.
Usage. Here's how we use our global configuration. You'll also see configurations for "rollup-y", which I'll elaborate on later, and additional aliases for each dashboard.
Libraries & packages
Having covered building Vite for SPAs, let's now see how to build libraries or packages. Here's an example configuration for building a UI-Kit library.
import path from 'path';
import react from '@vitejs/plugin-react-swc';
import { defineConfig } from 'vite';
import dts from 'vite-plugin-dts';

export default defineConfig({
  build: {
    cssCodeSplit: true,
    lib: {
      entry: path.resolve(__dirname, 'src/index.ts'),
      name: 'organization-ui',
      fileName: 'index',
      formats: ['es', 'cjs'],
    },
    rollupOptions: {
      external: ['react', 'react-dom'],
      input: {
        index: path.resolve(__dirname, 'src/index.ts'),
        theme: path.resolve(__dirname, 'src/styles/theme.scss'),
        typography: path.resolve(__dirname, 'src/styles/typography.scss'),
      },
      output: {
        assetFileNames: (assetInfo) => {
          const isIndex = assetInfo.name === 'index.css';

          return isIndex ? 'organization-ui.css' : assetInfo.name;
        },
      },
    },
  },
  plugins: [
    react(),
    dts({
      skipDiagnostics: true,
      entryRoot: path.resolve(__dirname, 'src'),
    }),
  ],
});
This way, we have no need for index.html and dev server/preview. On the other hand: we only need two plugins – the React plugin and the type declarations generator.
Important points regarding build configuration:
- cssCodeSplit - lets us split the CSS bundle into separate parts.
- Lib - activates library build mode.
- Entry - specifies the entry point.
- Name - is the package name.
- FileName - is the resulting file name.
- Formats - determine the bundle type – UMD, ESM, CJS, or IIFE.
- RollupOptions - configures the bundle.
- External - lets you specify packages to exclude from the bundle or set custom filtering.
- Input - designates entry points for the parts to be built.
- Output - adds filename modifiers, avoiding "index.css" for the main styles chunk.
Conclusions
This report is based on months of R&D done to find alternatives to Webpack, specifically react-scripts, which Webpack uses for building. We looked at several options, including pure Webpack with custom config, Parcel, Next.js, and Vite. For each option, we developed a separate version of one cabinet to test the capabilities and benefits.
The findings indicate that Vite is the best choice for the needs of our large project . The young bundle is a low-risk solution with easy migration providing us with unmatched speed, simplicity, and flexibility.