Serhii Butenko Staff Software Engineer (Cocoa)
visionOS Developer Tools, Live Activities & SwiftUI Data Flow

- #Swift
- #visionOS
- #iOS
• 6 min read
In this @mainNews article, we uncover visionOS SDK, new Swift HTTP Types and the Observation feature in Swift. I also review how Lyft created high-quality Live Activities to harness the full potential of the Dynamic Island for iOS.
Introducing Swift HTTP Types
Apple continues to release more open-source libraries. This time they introduced the Swift HTTP Types. The new library makes the process of creating network requests more convenient than it was with URLRequest. Apple added HTTPRequest, HTTPResponse as well as other structures for describing HTTP fields. The whole package consists of five structures and extensions for URLSession to convert new requests to old ones.
Nevertheless, I'm wondering why Apple made a dedicated package instead of making it part of the new Foundation on Swift. Maybe there's something we just don't know YET?
SwiftUI Data Flow 2023
In addition to open-source libraries, every year Apple improves SwiftUI and adds new APIs. In the previous @mainNews episode, I briefly introduced the new @Observable macro. Now it’s time to understand how to organize data flow to the UI considering all the updates.
Luckily, someone already explained SwiftUI property wrappers in a neat article with a diagram and code examples:
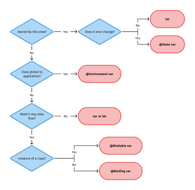
If your VIEW owns its state, then you should use the @State macro or a constant (depending on whether this state changes). If the VIEW doesn't own its state, but gets it from the outside, then you have to choose between @Environment, @Bindable, and @Binding.
The @Bindable macro only works with observable classes, while @Binding is still used for structures and primitive types. Naming could be better. New macros are tricky, but not as complicated as appears at the first glance.
Also, if you haven’t already, be sure to check out the video from Apple on Observation in SwiftUI.
visionOS
Let’s talk about visionOS. The latest Xcode beta versions include a simulator for visionOS. So developers rushed to check how their apps would look on Vision Pro. For example, here's a to-do list that was built without any changes. It looks pretty good.
In addition to visionOS SDK, Apple has added a few test projects called featured sample apps.

For example, Hello World introduces the basic concepts of spatial applications, while the Happy Beam ARKit game lets you cheer up sad clouds with a heart-shaped beam. Other apps show how to work with 3D video and spatial sound or use Reality Composer Pro.
Having a simulator is quite useful for development. But it will be a challenge to create a high-quality application without a real device. For now, there are only three ways to test visionOS apps:
- Ask the App Review team to test the app and give you feedback.
- Visit developer labs. Apple will be organizing events where you can install your app on Vision Pro and talk to Apple developers. Such labs will be available in London, Munich, and Cupertino.
- Get a Developer Kit, as it used to be with Apple Silicon. There is currently no information about this method. But it seems to me that Apple will not be very active in issuing devices.
That little island changes everything
Let’s end this article with an interesting case study. Lyft, a ride sharing service, shares how they created Live Activities for their iOS app.
The key challenge was creating 26 possible trip states for four Live Activity appearances: compact, minimal, expanded, and lock screen. In total, the team had to design 106 different states to cover all possible Live Activity appearances.

The Lyft team faced another challenge: how to display the driver's progress?
- The simplest solution was to Divide the progress by the number of minutes it will take for the car to arrive moving the car icon to the right every miniature. However, the scale becomes a bit unclear because cars move at different speeds depending on the estimated arrival time.
- Another solution is to make dynamic progress. The whole progress bar is divided into a certain number of steps that do not depend on the arrival time. In this case, it is 10 steps. The car that arrives in 3 minutes will be 3 steps away from the finish line. And the car that arrives in 9 minutes will be 9 steps away. So the user will understand that the car is about to arrive or is still far away.
Lyft went with the second option. If you’re wondering why Lyft decided the second solution was better, be sure to check our series on design principles – a set of values that help govern decision-making in these situations.
The whole process is uncovered in a dedicated post with extreme detail and many awesome illustrations. I highly recommend checking it out and learning from the Lyft experience, especially if you’re planning on adding Live Activities to the Lock Screen and Dynamic Island.
One of the lessons I learned is no to cram as much information as possible into a Live Activity. Instead, Lyft designers’ advice is to embrace your limitations to understand what and in what form is actually important to the user.
That’s it for now. See you in the next episodes of @mainNews with the new updates!
Resources
- Introducing Swift HTTP Types
- SwiftUI Data Flow 2023
- “That little island changes everything”
- Tasks: To-Do List & Kanban in visionOS
- Hello World in visionOS
- Happy Beam in visionOS
- Work with Apple
This is an independent publication and it has not been authorized, sponsored, or otherwise approved by Alexander Savard from Lyft Design+ and Apple Inc.